Installing Havelock Wool Insulation In Our Van
Insulation is a hot topic in the van world.

But It’s one of the most important parts of a van build.
It keeps the van comfortable in any weather, acting as a barrier to heat flow and sound.
But there’s a lot of debate about the right way to do it.
We spent hours researching trying to find the right insulation solution.
What is the most effective insulation for a van?
Which one would be safe to use?
How do we even install it?
We wanted something that was suitable for a van, non-toxic, could manage moisture, and had a high R-value per inch.
But it was easy to get lost in the sea of information.

We stumbled across sheep wool insulation, and it seemed to fit all our criteria.
Problem was, no one was selling sheep wool insulation in Australia anymore.
It was everywhere about 20 years ago, but over the years it (apparently) just got too expensive to manufacture.
Some suppliers across Australia sell a hybrid insulation of sheep wool and polyester insulation, but the percentage of wool is variable, sometimes as low as 20%.
We came across Havelock Wool insulation in the early days of our van build, a 100% sheep wool insulation from the U.S. specifically geared towards vans.
We actually thought it was the perfect solution, but it just wasn’t available in Australia.
Until we heard Car Builders were going to start importing Havelock Wool. And we knew Car Builders because we had gotten our sound deadening from them.
So that’s how we got to installing 100% sheep wool insulation in our van!
(fist pump x1000)
The Importance Of Insulation
A lot of people say that because the climate in Australia is hot, insulation is unnecessary in a van.
However, insulation doesn’t just keep the van warm – it also keeps the van cool on hot days.
Additionally, insulation helps regulate air quality, moisture, and sound.
But there are good and less good types of insulation.
And a big factor in this is the R-value.

Our little van helper.
What Is R-Value?
R-value is the thermal resistance rating.
It quantifies the insulation’s resistance to heat flow.
The higher the R-value, the better the insulation.
The R-value formula is:
R-value = Thickness(m) / Thermal conductivity (W/mK)
Essentially, this means two factors affect the efficacy of the insulation: the thickness of the material and the thermal conductivity of the material.
In other words, packing the walls with poor quality insulation will not necessarily increase the efficacy (or R-value) of the insulation.
Havelock wool has an R-value of 3.6 per inch (and R7 at two inches of depth), meaning it resists heat flow well – both into and out of the van.
This helps keep the climate in the van more consistent and comfortable.


So, Why Havelock Wool Insulation?
Wool has many properties that makes it ideal for a van build.
Here are a few of the reasons we chose Havelock Wool:
It’s All Natural
Wool is a natural insulator. Havelock Wool is sourced from sheep that graze on the rolling hills of New Zealand.
It is a renewable resource, and Havelock has specialised practices to sustainably convert 100% raw wool into insulation, like using low impact textile manufacturing techniques and repurposed machinery. The wool is bonded with a needle punch rather than a chemical binder and boric acid is added for fire and insect repellence.
Additionally, wool is biodegradable. So, at the end of its life, wool can be composted to avoid landfill!
Havelock Wool has more details about their environmental impact here.

Photo from Havelock Wool
It’s Effective (Wool Has A High R-Value)
The inherent characteristics of wool means that it’s a very effective insulator.
Wool traps air better than most other types of insulation Due to the design and spring-like shape of the fibers.
As a result, Havelock Wool has an R-value of 3.6 per inch.
Afterall, there’s a good reason sheep grow such thick woollen coats!

It’s For Vans
Havelock Wool is made for vans.
The wool batts fit into the wall cavities of a van easily and can be pulled apart to fill all the nooks and crannies too, helping to cover any thermal bridges and better control the temperature inside the van.
It’s is a natural product that doesn’t degrade or off-gas over time, helping to maintain air quality in a small space like a van.
Additionally, wool naturally absorbs and releases moisture without losing its insulative ability, keeping the van dry with less risk of mould or mildew (which is a real concern in the van interior as trapped water from condensation can breed mould).
Wool also absorbs sound, helping with sound transmission in an otherwise noisy metal box (especially when combined with sound deadening).
It’s Safe To Use
Unlike other types of insulation like fiberglass (which requires full protective gear to handle), wool is safe to touch. You don’t need glasses, gloves, or protective clothing when installing it.
Additionally, it helps passively filter the air, it doesn’t off-gas, and it also inherently suppresses mold, meaning it’s probably the safest type of insulation to use.

It’s Easy To Install
Havelock Wool is really simple to install. The wool battens fit easily into the wall cavities (mostly without needing to be cut) and can be pulled apart to fit into small spaces.
As wool is safe to handle, the install is actually fun because you can play around with it. It also doesn’t require many tools to install either.
It’s High Quality
One of the biggest appeals of Havelock Wool is the quality.
Aside from nature’s own R&D, Havelock has invested a lot of time, energy, and resources into the science and technology of the product. They source the highest quality fibers, best suited for insulation, and use a specialised manufacturing process to make a uniform, high-quality product.
We couldn’t find any other similar products on the market in Australia.

The Drawbacks Of Sheep Wool
There are so many advantages of using sheep wool insulation, and we can’t see us using any other material for future builds. However, it’s important to note there are some drawbacks too:
Whilst the product itself is sustainable, the manufacturing, transport, and distribution of the product is something to consider when it comes to the environment
The wool is procured as a byproduct of the meat industry, so the idea of that may not be for everyone
The wool has the faint scent of sheep, so the van can smell like a farm for quite a time after the install (although we actually thought this was a bonus, because it feels like getting a big woolly cuddle!)
Although it provides a high R-value, Havelock Wool can be costly at $300+ for 15 square metres. However, it doesn’t require a vapor barrier or other additional materials like other insulations, which helps lower the overall cost of the build and makes the install easier.
Other Insulation Options
We haven’t looked back since installing our Havelock Wool insulation.
But there are a few other types of insulation on the market we considered:
Hybrid Insulation (Wool And Polyester Blend)
One of the strongest contenders to wool insulation for us was hybrid insulation – which is usually a mix of wool and polyester.
Hybrid insulation is a bit more cost effective, however that usually comes at the price of a lesser R-value.
The percentage of wool in the product is also often undisclosed/unknown by the supplier, so it’s hard to actually know what you are getting.
Additionally, mixing the wool with a synthetic – what is effectively just plastic – seems to defeat a lot of the benefits of wool (which is otherwise natural, mold-resistant, and compostable).

Photo from Mountain Made x Terralane
Thinsulate
Another contender for us was Thinsulate, an insulation product from 3M.
It kind of looks like a very thin pillow, and is used in some warm-weather clothing, such as ski gear.
The fibers are synthetic and it has a very low R-value, so it’s hard to justify the cost for the amount needed to decently insulate the van.
Nonetheless, people use it in their van build for insulation, sound deadening, and moisture control.

Thinsulate from 3M
Glasswool (Fiberglass)
Fiberglass insulation, known as glasswool, is commonly used for van insulation.
It’s been an industry standard for residential and commercial projects for decades.
Glasswool is often made from recycled glass, which is melted and spun into fibers.
People like this insulation because it has a high R-value, and it’s cheap and readily available.
However, it doesn’t have the natural properties of wool, like air and moisture management. It can also be a health risk, especially during the install, because it’s an irritant to the skin and dangerous when inhaled.

Photo from Bunnings
Rockwool (Mineral Wool)
More dense and rigid than glasswool, rockwool is a mineral wool that is manufactured from volcanic rock (basalt) or recycled rocks from mining (slag).
The raw materials (stones) are heated and spun, then cured into the final product.
It’s popular in the building industry as it has a higher R-value than glasswool, however it can be more expensive too.
Just like glasswool, it also requires protective gear to install and should be sealed off when completed, as the fibers can get into the lungs.

Photo from Rockwool Insulation
Hemp
Hemp has come onto the market as an eco-friendly natural insulation alternative.
Hemp is a renewable material, and is often mixed with other materials like polyester or lime/sand to form “hemp bricks” or “hemp-crete” respectively that can be used as insulation.
This space is still developing, but more and more people are using hemp insulation in their projects, mostly in exterior walls, roofs, and flooring.

Photo from Hempitecture
Cork
Cork insulation was a surprise to us. We really only associated cork with wine bottles and pin boards.
However, cork is a sustainable material that can be used as insulation.
It is naturally water-resistant, acts as a sound deadener, and can be recycled at the end of its life.
Whilst this is something to consider for future builds, it was a bit too new and untested for us to consider in this build.

Photo from Green Building Advisor
Foam Insulation
Foam is a popular and affordable insulation. It comes in various different forms, including:
Polyiso Foam Board
Polyiso, short for polyisocyanurate, is a thermoset foam board.
It has a higher R-value and melting temperature than other foam boards.
Often Polyiso boards come with foil on both faces of the insulation, which acts as a moisture barrier and radiant heat barrier.
Polyiso is non-toxic and doesn’t off-gas, but still doesn’t match the eco-friendly properties of sheep wool insulation.
We decided to put Polyiso in our ceiling under the Havelock wool for the radiant heat barrier properties of it (and we also put some of the leftovers in the deep wall cavities too).

EPS (Expanded Polystyrene) Foam Board
EPS is a petroleum-based thermoplastic foam insulation.
EPS is typically light, a factor that is always good to consider in a van build.
As a result, it’s a popular choice for insulating a van because it’s more cost effective than other types of insulation.
However, EPS boards may deteriorate in high temperatures, meaning there is a risk of off-gassing.

Photo from Bunnings
XPS (Extruded or Expanded Polystyrene) Foam Board
Often used for floor insulation due to its compressive strength, extruded or expanded polystyrene insulation (XPS) is a widely popular insulation. Similar to EPS, XPS is a petroleum-based thermoplastic.
However, as it performs better, it is more expensive than EPS. Additionally, HCFs (hydrofluorocarbons) are used during the production process though which are potent greenhouse gases.

Photo from Expol
Spray Foam
Spray foam probably provides the most coverage of any insulation type. As a result, it’s often used by van builders living or looking to venture into colder climates.
It can be installed as a DIYer or by professionals – either way, it can get messy quick, and it’s pretty much irreversible.
Ultimately, whilst spray foam has an excellent R-value, it can be expensive, difficult to install, and may have health implications due to off-gassing over time.

Photo from RetroFoam
Reflectix
Reflectix is designed to insulate heat by reflecting the sun.
It is great for thermal resistance in windows or outside the van. However, it probably won’t be an effective insulation solution in the interior on its own, so should be combined with other insulating materials.

Photo from Reflectix
Other Types Of Insulation
There are other types of insulation as well, including cellulose, wood fiber, and denim. Each of these have their own pros and cons. More and more people seem to be opting into these alternative building materials. Definitely a space to watch!


Photos from The Spruce, Insulate Naturally, and Soprema
How To Install Wool Insulation
So, how DO YOU INSTALL Sheep wool insulation?
Havelock actually has a ton of guides on how to install their sheep wool insulation – particularly The Official Havelock Wool Van Installation tutorial — so that’s probably the best to follow.
here’s what we did:
1. Calculate the coverage area
Havelock Wool has an estimation chart (for vans) and insulation calculator (mainly for residences). However, we just calculated it manually by measuring the height and length, and working out the depth of the area we needed (we have a Renault Master MWB).
For better accuracy, we’d use the calculator or a table like this next time:

Tip: It’s best to overestimate. Whilst we calculated just enough, we could’ve added a contingency to our calculation to better accommodate the depth of the cavities and all the nooks and crannies we didn’t account for, particularly in the door panels and wall ribs.
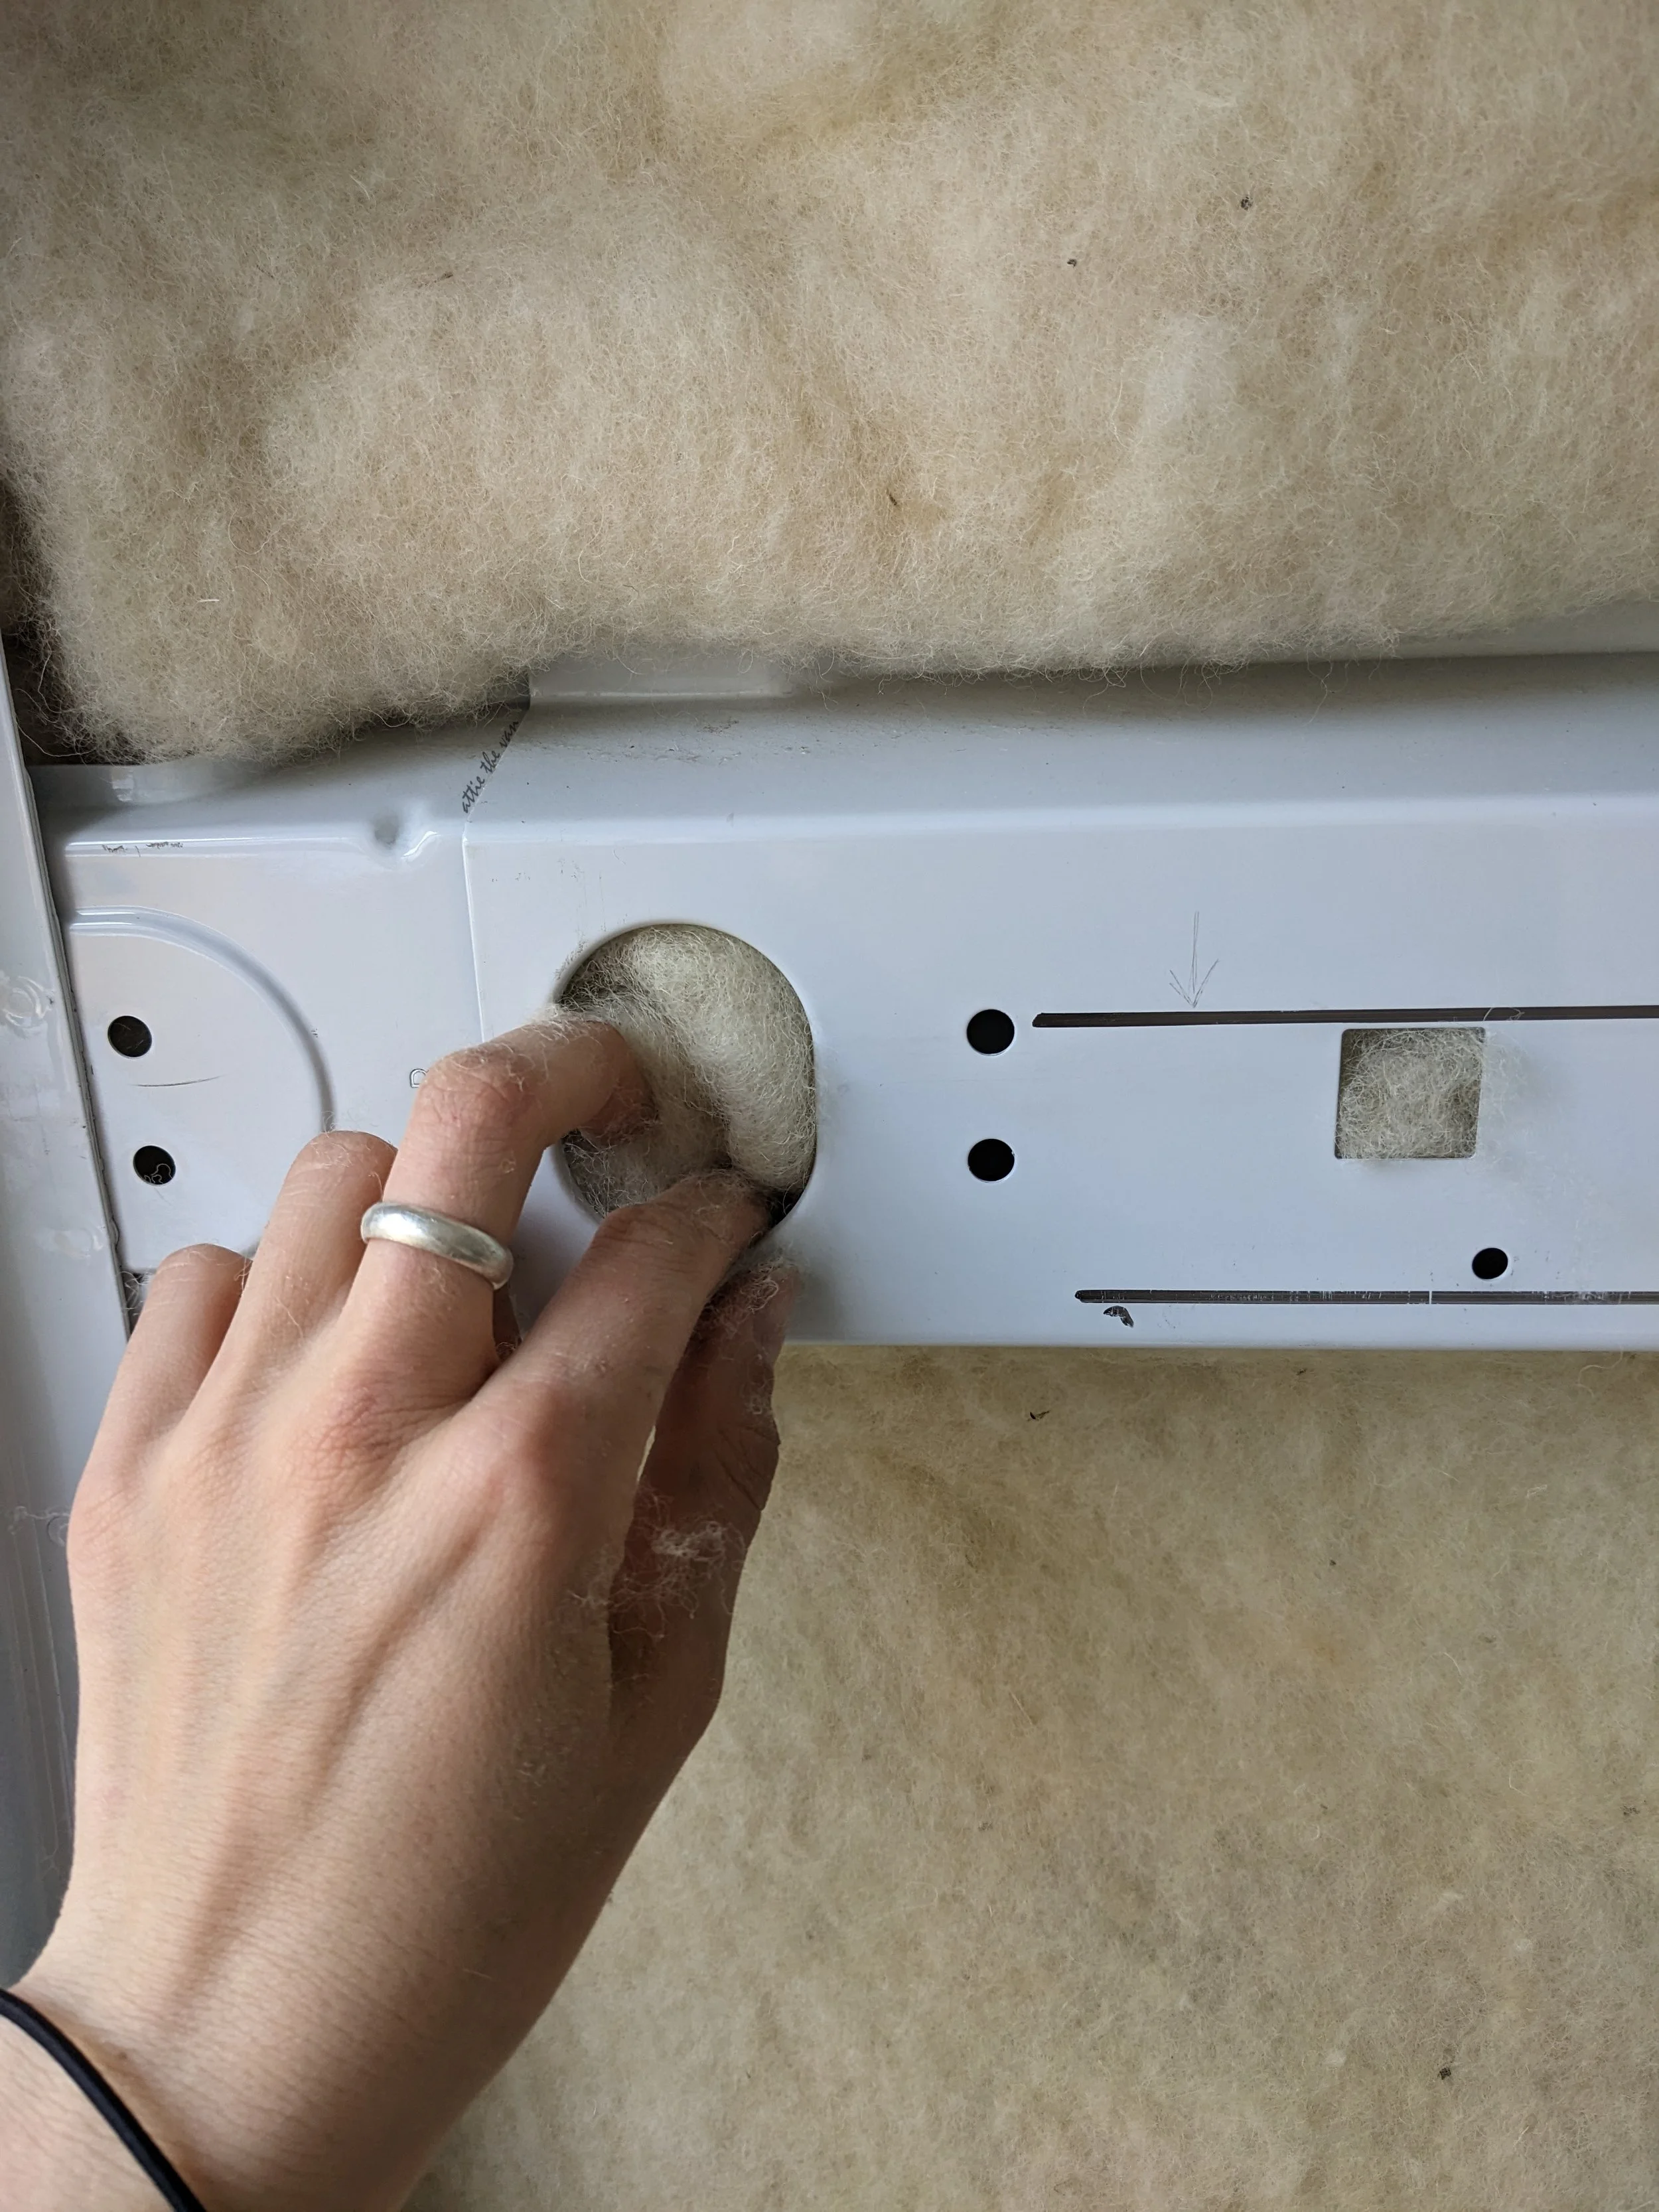
2. Test and Play
As soon as we opened the box, we could immediately see the quality of the wool – it’s warm, soft, and we could touch and play with the wool without needing protective gear.
Once we were done making faux moustaches, we set up a test patch to determine the best way to install it in the van.
Because sheep wool is soft and malleable, it has a tendency to slump over time – so the thermal drift is higher than other insulation materials.
Havelock recommends using string, staples, mesh, or tape (or even glue) to fix the wool to the van walls.
We decided to do a quick glue spray – it was the easiest and most effective solution (we tried insulation tape too, but it didn’t hold that well). However, we do realise this takes away from the natural-ness of the product.


3. Clean & Prep
Next, we cleaned the areas for installation.
We had a bit of debris and dust from the build and trips, so this was an important step for us.
In preparation for the dry fit, we also roughly laid out the quantities we needed in each section.

4. dry Fit
We did a quick dry fit of the wool in each section to check the dimensions and see where we needed to cut the batts.
Tip: We found it better to fit the larger areas first before pulling batts apart to create “puffs” for the small crevices as we naturally created these when installing the wool in the larger areas. (In contrast, Havelock wool suggests making the puffs first in some of their videos).

5. Install
Then, it was time for the install.
We worked in sections using three main steps:
Cut or tear the batt to size (as needed) — the battens fit pretty much perfectly in the large cavities of the van without needing to be cut or modified (because they are designed to be installed in vans!)
Apply a light coat of spray glue (both to the wall and the wool batt)
Stick the wool batt to the wall
For the deep wall cavities, we doubled up and stuck another layer of insulation over the top of the first.
Tip: Don’t overstuff the wool insulation as compression reduces the R-value of the wool insulation. Instead, go easy and create space for the wool to do it’s insulation thing in the wall.


6. Fill the gaps
After that, we had a pile of off-cuts, which we ripped into puffs of wool. We used these puffs to fill all the nooks and crannies in the van for optimal thermal efficiency, focussing on filling any thermal bridges, particularly those in the ribs of the van.

Stand back and feel the Comfort!
It took a long time for us to get the hang of, but we got there in the end. It was actually quite a simple process once we got going.
We’ve subjectively tested the warmth factor already, and can feel a very noticeable difference (which is probably only going to improve as the build gets finalised).
And in the meantime it smells great — just like a farm!
Tip: We are also installing a MaxxFan to help manage moisture and temperature too. Additionally, our front windows are covered with Reflectix and the other windows are insulated with black-out coverings we made with sheep wool.

One of the key question we had before the installation was…
Do I Need A Vapour Barrier?
Havelock Wool does not recommend using a vapour barrier. As sheep wool naturally absorbs and releases water, it shouldn’t be put behind a barrier. Additionally, a vapour barrier is only as good as the seal, and a good seal is almost impossible in a van – so the water can still get through and may even get trapped, causing mold or rust issues. Better to go without and focus on moisture control instead! For these reasons, we didn’t install a vapour barrier, and would not recommend it either.
Attie The (Now) Woolly Van
We are stoked with the results of installing wool insulation.
In fact, we couldn’t imagine using anything else for future builds.
For anyone looking for an effective and health-conscious way to insulate a van, Havelock Wool is definitely the go.
Always good to compare it to the other insulation options before deciding though!

Helpful Resources
We found a few key resources were helpful for choosing and installing our insulation:
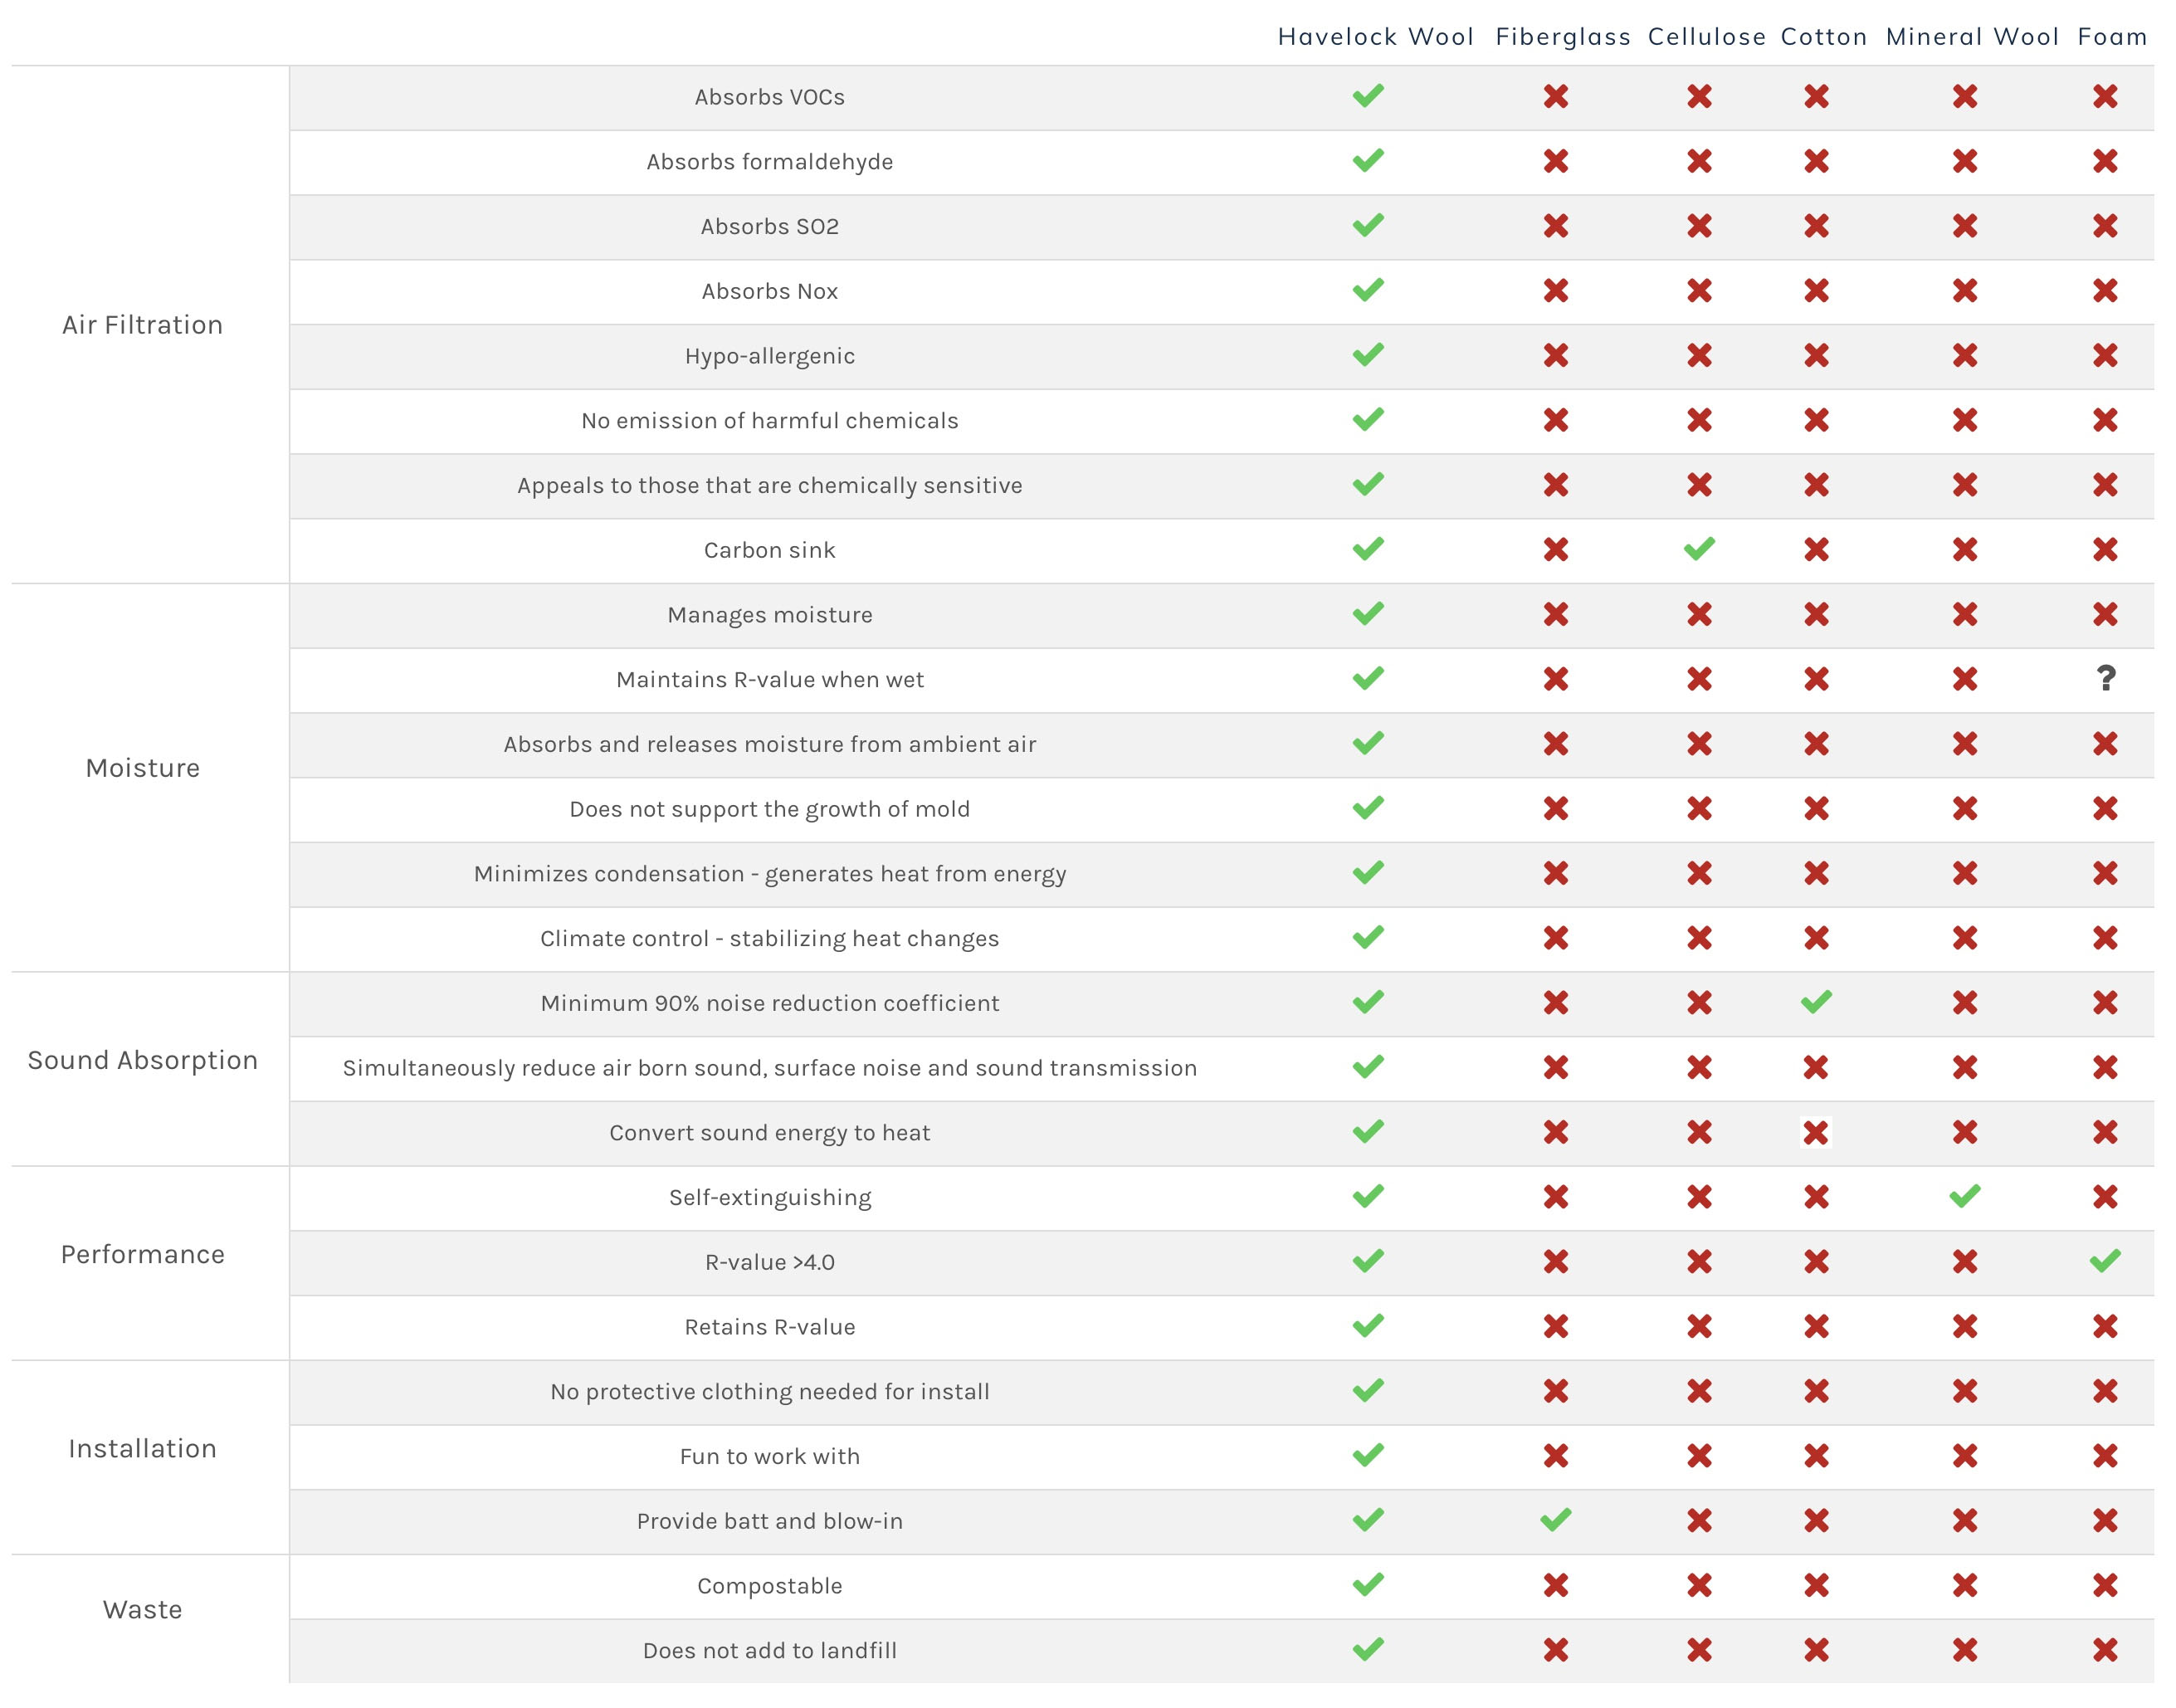
Havelock Wool Installation Videos, including The Official Havelock Wool Van Installation video. Additional key resources from Havelock include their Environmental Product Declaration, Declare Label, and their video on the company ethos. They also have a comparison table on the properties of different types of insulation compared to sheep wool.
Gnomad Home has a thorough review of the pros and cons of the various insulation types, which definitely helped guide our decision making for our own insulation installation. The article is very thorough and includes information about heat science, a comparison of different types of insulation and R-values, and a step-by-step guide on how they installed their insulation.
Videos from Seven O’Savage, a down-to-earth dude who shares all his knowledge about van builds (note, he used 3M Thinsulate to insulate his van).

Disclosure: In collaboration with Car Builders, we received this product at no cost. Attie the Van is an independent website, and we only ever recommend products or services that we personally use and love (and that we would buy ourselves)! Anything mentioned is our honest opinion. As always, we encourage readers to conduct their own research and make their own informed decisions.